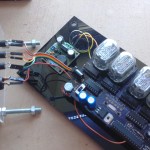
So as you can see in the video above, I made a nixie tube clock. It looks something like this (infact it looks exactly like this, because this is a picture of it):
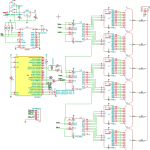
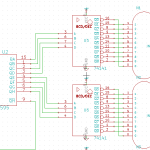
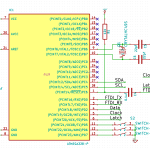
Below is the schematic for the project, as you can see I'm using 6 IN12 nixie tubes, each with it's own 74141 nixie tube driver. These drivers are great! They simply connect directly to the nixies and display whatever 4 bit binary number you give them (if you give them anything above 9 they blank the display - hence why I use the number 10 in my code to blank the nixies). Because they take in a simple 4 bit binary number, I can hook them directly up to some shift registers to drive them, in my case I used 3 74HC595 shift registers (available everywhere), because they can be "daisy chained" together, meaning in the code I only have to write one 24 bit binary number and it will display all 6 numbers on the nixies. Though in reality I split them up into pairs and write three 8 bit binary numbers.
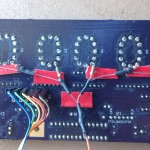
To use the 74141s you need to connect the live pin of the nixies (through a resistor - in my case 1k5) to the high voltage supply, and then each pin to it's corresponding pin on the driver, which can be found on the datasheet. On my board I forgot these 1k5 resistors and had to modify it. My original board had the live pins going straight to the supply, so I had to cut that trace on the board, and botch in some resistors to each of the tubes, the result is below:
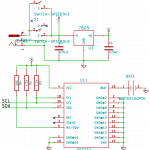
For my main chip I'm using an ATMega328P (the same chip as is in the Arduino Uno), and I'm running the arduino bootloader on it so I can program it in the arduino language - just to make things simpler.
It is interfacing with a DS3232 real time clock chip, which I would highly recommend! It is a great chip which holds hours, minutes, seconds, year, month, date, day of the week (all of which are adjusted for leap years automatically) and it has a tonne of usable SRAM inside it. It's also really really accurate, with a temperature compensated crystal oscillator inside the chip, and fairly easy to interface with (though early on I had some issues - I think it was too much capacitance on the line as I was testing it with cables plugged into the chip socket) over I2C. The only downside I can see is it only comes in a SMD package, which I know some people don't like soldering. Unfortunately I don't have a picture of it, as it's tucked underneath the coin cell battery holder.
For the high voltage supply I simply ordered one of eBay, as it was simpler and cheaper than designing my own! The one I used was this one.
For the case to my project I laser cut an acrylic front and back and used some chunky nuts and bolts I had lying around to hold them together, as well as to hold the PCB in.
As mentioned in the video, there is a bug free board available on OSHPark if you want to order my board and build this yourselves, and all my code is up on github, links in the banner to where you can find all that!



Can you share PCB files for the nixie tube clock made with In-14 tubes like here https://nixietubesclock.com/products/steampunk-nixie-tube-clock-model/
Hi Jeff,
Unfortunately I never made a schematic for IN-14 tubes, so I cannot. However, the design files for our nixie tube driver are available for download here and you can swap out the part yourself? Alternatively if you wish to buy a Nixie Tube Driver for your project you can find it available for purchase on our tindie store.
Thanks,
Thom
Thank you. Downloaded.
Hey sorry to bother you but i cant find downloads for your schematics. Can you send me the links? thanks
Hi there,
The KiCad files are unfortunately not available, however the schematic can be found in the blog post, and the board design is available for order at OshPark, or you can download the Gerbers from the same link.
I hope this helps!
Tom
Hi Tom,
Any chance of posting the BOM for this project? I would like to try and and build one of these using your PCB.
Thanks!
Hi Rich,
The BOM can be found here, if you have any other questions please feel free to get in touch! Also if you’re interested we will be selling a Nixie Tube Driver perfect for building this kind of clock soon, if you’re interested you can register for updates on that project here.
Thanks, Tom
Tom,
Sorry I didn’t see the BOM in a previous post. I do have one more question on the DS3232, does is matter which part number I buy?
Hi Rich,
Sorry for the late response, as long as the DS3232 you buy is a SOIC package it should work absolutely fine in this project. However, if you would like the specific part code of the chip I used, it is the DS3232S#.
Thanks, Tom
Tom,
Thank you for the information and helping and EE newbie. I have one other question would it be possible to use the DS3231 instead of the DS3232? I didn’t notice to many differences in the spec sheet.
Thanks Rich
Hi Rich,
Having had a quick scan over the data sheet I think it should be possible to use the DS3231, however you must make sure the package and pin layout is the same.
If you have any problems feel free to get in contact again,
Cheers,
Tom
Hi Tom,
very nice Project.
I built the Clock, but when compiling the Code, i’ll get an error:
Arduino: 1.6.8 (Windows 10), Board: “Arduino/Genuino Uno”
C:\Users\Eric\Documents\Arduino\tom_cousins_nixie_clock\tom_cousins_nixie_clock.ino: In function ‘void setTime()’:
tom_cousins_nixie_clock:154: error: ‘class DS3232RTC’ has no member named ‘writeTime’
RTC.writeTime(time);
^
exit status 1
‘class DS3232RTC’ has no member named ‘writeTime’
When uncommenting last code line // RTC.writeTime(time),
compiling the code works,
Clock works, adjusting Time works, but not able so save it to the RTC.
Any idea?
Thanks,
Eric
Hi Eric,
I’ve had a look into the .cpp and .h files for the DS3232RTC library and the function ‘writeTime’ is definitely in there! Are you sure you’re using the latest iteration of the DS3232RTC library? The version I’m using can be found here: https://github.com/Tecsmith/DS3232RTC
The only other thing I can think of is that you may be using the older version of the code? The newest version can be found here: https://github.com/8163jb/Nixie-Clock/tree/master and is the Nixie_20-04-2016 file.
I hope this solves your problem 🙂
Cheers,
Tom
Hi Tom,
works fine now. Seems, I had an outdated version of the RTC Library.
You saved my day 😉
Thanks
Eric
Hi Tom,
I finally found the time to start putting together the nixie tube clock. Everything went onto the printed board smoothly but I’m getting some errors when I verify the code in Arduino:
Nixie_2:30: error: ‘DS3232RTC’ does not name a type
Nixie_2.ino: In function ‘void loop()’:
Nixie_2:78: error: ‘RTCTime’ was not declared in this scope
Nixie_2:78: error: expected `;’ before ‘time’
Nixie_2:79: error: ‘rtc’ was not declared in this scope
Nixie_2:79: error: ‘time’ was not declared in this scope
Nixie_2.ino: In function ‘void setTime()’:
Nixie_2:150: error: ‘RTCTime’ was not declared in this scope
Nixie_2:150: error: expected `;’ before ‘time’
Nixie_2:151: error: ‘time’ was not declared in this scope
Nixie_2:154: error: ‘rtc’ was not declared in this scope
I’m wondering if the libraries I added our not the same version as your code needs?
Do you have a source for the SoftI2C.h, DS3232RTC.h, avr/pgmspace.h, string.h libraries?
Thanks,
Jason
EDIT: See comment below for link to updated code
Hi Jason,
Unfortunately most (if not all) of the libraries I used have been updated and are now incompatible, but I am in the process of re-writing the code for the clock and will update when I can. I have no idea how long this will take however as I am currently focusing on my university final project for the year.
All the sections of code devoted to writing a number to the nixies should work just fine, as it requires no libraries. So see if you can find an alternate set of libraries for interfacing with the DS3232. I believe there are a couple available.
Sorry I cannot be of more help at the moment,
Thanks,
Tom
Hi Jason,
I have recently updated the code for the project. The new code can be found here: https://github.com/8163jb/Nixie-Clock/tree/master I hope this solves the issues you were having! If not get back to me and I will endeavor to sort them.
Thanks,
Tom
Hello,
I’ve reviewed the csv file and have a few questions.
Could you please email me more information about the components used, values, dealer/website/RadioShack/etc.?
Thank you,
Spencer
Hi Spencer,
All the values you need are on the .csv file already. As for the dealer, I got mine through a combination of Mallinson Electrical and Farnell in the UK, but only because these are the closest dealers to me and I like supporting the industry in my own country. If you are UK I would recommend these two, but if not I suggest you do a bit of research into who is closest to you. Hope this helps!
Hi Tom,
Thanks for posting such an awesome project. I would like to attempt this (I have ordered your board from OSH) but I am a little unclear as to the component list. Is it possible to send me a higher resolution image of your schematic; I’m having trouble reading what each component is.
Thanks,
Jason
Hi Jason, unfortunately I can’t send you a higher resolution schematic as KiCad does not export them. However I have made you a .csv file with all the components listed alongside their values. It should help you decipher what they are. All the references are also printed on the PCB for you to be able to compare. The file can be downloaded here. I hope this helps!
Perfect, thanks.
great read
hi Tom, excellent post!
Can you please share the pcb files (eagleCAD, etc) ? I would like to order that PCB from OSH,
thanks!
Pingback: Nixie tube clock | RLabs